While many organizations will deploy a hybrid identity solution and manage accounts on-premises, you may face scenarios where you need to manage cloud identities or guests in bulk (such as when creating bulk guest user invitations or during a tenant-to-tenant migration procedure).
These operations can be performed in several ways, including through the Microsoft 365 admin center, the Azure AD portal, and various PowerShell commands.
Microsoft 365 Admin Center
The Microsoft 365 admin center allows you to perform bulk user additions, either interactively or by uploading a specially-formatted CSV.
To begin the process, select Add multiple users on the Active users page of the Microsoft 365 admin center, as shown in Figure 2.32:

Figure 2.32 – Active users page
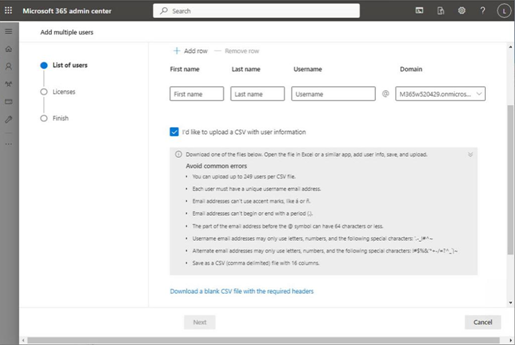
On the Add multiple users flyout, you can choose to either enter basic details interactively (up to 249 users) or you can download a CSV template with more fields that can be populated. See Figure 2.33:

Figure 2.33 – Configuring the bulk user upload
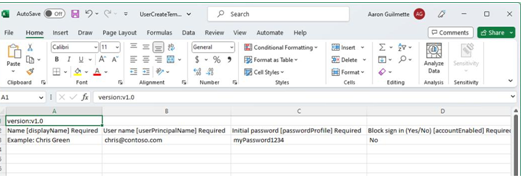
If you choose to work with a bulk user template, you can edit it in any text editor that supports CSV files. You must preserve the first row, which has the fields or header information. You can add up to 249 users, each on its own row. See Figure 2.34, where Microsoft Excel is used to edit the user template:

Figure 2.34 – Microsoft 365 admin center bulk user template
After you have either added the users in the admin center flyout or into the CSV and uploaded it, you can click Next to go to the next page of the wizard.
On the Licenses page, you can assign a Location, licensing plan, and optionally, the individual services that will be enabled. When you’ve completed your selections, click Next to proceed to the confirmation page and click Add users to submit the operation.
Azure AD Portal
Bulk operations can also be performed through the Microsoft Azure AD portal. In contrast to only the create option provided by the Microsoft 365 admin center, the Azure AD portal supports Bulk create, Bulk invite (for guest users), and Bulk delete operations. See Figure 2.35:

Figure 2.35 – Bulk operations menu in the Azure AD portal
To get started, you’ll need to use one of the templates provided in the Azure AD portal. On the Users blade, select Bulk operations and then choose the appropriate operation.
Note
The templates in the Microsoft 365 admin center and Azure AD portal arenot interchangeable.
You’ll need to use the correct template for the interface that you’re working with.
On the corresponding flyout, you’ll see the Download option for the template. Once it’s downloaded, you can edit it in any app that supports CSV files. See Figure 2.36:

Figure 2.36 – Azure AD bulk user create template
It’s important to note that the first two rows of any of the templates must be preserved and not modified in any way. Each identity to be modified is included in a separate row, starting at row 3. The first four fields (displayName, userPrincipalName, passwordProfile, and accountEnabled) are required. All other fields are optional.
When finished, you can upload the CSV back to the same flyout in the Azure portal to process the request.


