For most Azure AD group administration use cases, you’ll probably use the Microsoft 365 admin center. To configure groups in the Microsoft 365 admin center, follow these steps:
- Navigate to the Microsoft 365 admin center (https://admin.microsoft.com). Expand Teams & groups and then select Active teams & groups. See Figure 2.18:
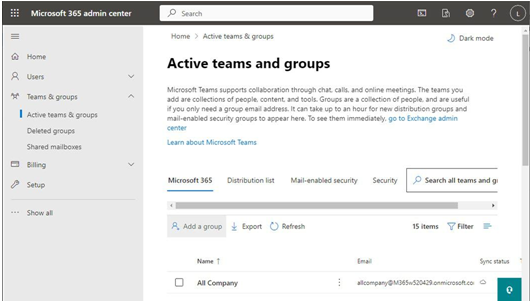
Figure 2.18 – Active teams and groups
- Click Add a group.
- On the Group type page, as shown in Figure 2.19, select the type of group you wish to create. Except for Security groups, all group types will require essentially the same information (non-mail-enabled security groups do not allow you to add owners or members to the workflow). If you select a Microsoft 365group as your group type, you’ll also have the option at the end of the wizard to create a Microsoft Teams team from the group.
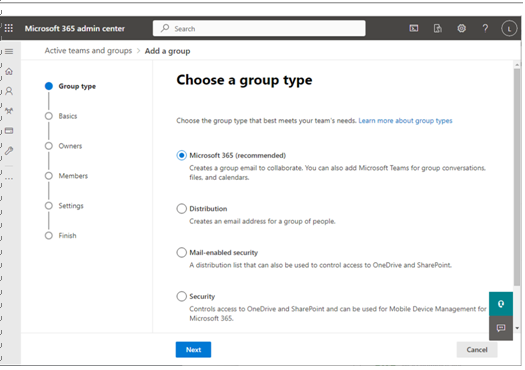
Figure 2.19 – Choose a group type
- On the Basics page, enter a Name and an optional Description for the group and then click Next.
- On the Owners page, click Assign owners to assign at least a single owner. Microsoft recommends having at least two owners (in case one leaves the organization or is absent for a period of time). The owner cannot be an external guest. Click Next when finished.
- On the Members page, click Add members (this is an optional step). Click Next to proceed.
- On the Settings page, configure the settings for the group and then click Next:
For distribution groups and mail-enabled security groups, this includes an email address.
For Microsoft 365 and security groups, this includes assigning Azure AD roles. The option does not appear for mail-enabled security groups, though it can be added later.
For distribution groups, this includes the ability for users outside the org to email the groups (Microsoft 365 groups must have this setting configured manually in the Exchange properties for the group object afterward).
For Microsoft 365 groups, you can also configure privacy settings (eitherPublic or Private). Public groups can be browsed and joined by anyone while private groups require an owner to add additional members.
Also, for Microsoft 365 groups, you can choose to convert the group to a team, though users must have a Teams license assigned to access the group.
- On the Finish page, review the settings and click Create group.
After the group has been created, you can modify its settings in either the Microsoft 365 admin center or Azure AD portal, as shown in Figure 2.20:
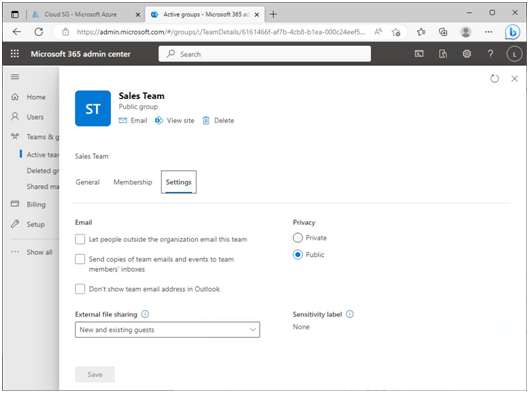
Figure 2.20 – Modifying settings of a Microsoft 365 group
As you can see in Figure 2.20, Microsoft 365 groups have some additional properties (such as determining whether to send copies of emails received by the group mailbox to individual team mailboxes or associate with a sensitivity label).


