There are several scenarios where you may need to bulk-create users or contacts or bulk-invite users to your tenant. Frequently, when these operations are required, you will be working with source data stored in a comma-separated values (CSV) text file.
Previously in the Performing Bulk User Management section, you used a specially-formatted CSV to import objects into the Microsoft 365 admin center. You can use a similarly-formatted CSV to perform the action with PowerShell.
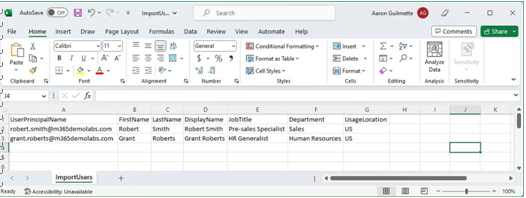
In this set of examples, we’ve entered a few names into a CSV file (as shown in Figure 2.40) to demonstrate bulk user processing. While some of the administrative interfaces (such as the Microsoft 365 admin center) limit you to a maximum of 249 objects, you can process thousands of objects with PowerShell—the only real limitation is the memory on your computer.

Figure 2.46 – Bulk user template
First, you’ll perform the operation with the MSOnline cmdlets. Begin by importing the CSV source file and storing it as a variable. Then, with a Foreach command, you’ll iterate through the lines in the CSV, using the values stored in the $User variable to provide the inputs for each of the parameters:
$Users = Import-Csv -Path C:\temp\ImportUsers.csv
Foreach ($User in $Users) { New-MsolUser -UserPrincipalName $User. UserPrincipalName -FirstName $User.FirstName -LastName $User.LastName -DisplayName $User.DisplayName -Title $User.JobTitle -Department $User.Department -UsageLocation $User.UsageLocation -Country US }

Figure 2.47 – Bulk creating users with New-MsolUser
Next, you’ll look at doing the same thing with the Azure AD cmdlets. As with the other examples in this section, you’ll see that the syntax follows a pattern, but there are other required parameters that must be specified. In the case of New-AzureADUser, it is a PasswordProfile object (which is used to specify a password) and MailNickName that must be supplied:
$Users = Import-Csv C:\temp\ImportUsers.csv
$PasswordProfile = New-Object -TypeName Microsoft.Open.AzureAD.Model. PasswordProfile
$PasswordProfile.Password = “P@ssw0rd123”
Foreach ($User in $Users) { New-AzureADUser -UserPrincipalName $User. UserPrincipalName -GivenName $User.FirstName -Surname $User.LastName -DisplayName $User.DisplayName -JobTitle $User.JobTitle -Department $User.Department -UsageLocation $User.UsageLocation -Country $User.UsageLocation -AccountEnabled $True -MailNickname $User. UserPrincipalName.Split(“@”)[0] -PasswordProfile $PasswordProfile }

Figure 2.48 – Creating new users with New-AzureADUser
Finally, you’ll look at bulk user creation with the Microsoft Graph-based cmdlet New-MgUser. It has very similar parameters to the New-AzureADUser cmdlet, with the main difference being how the $PasswordProfile object is created and that the AccountEnabled parameter does not require an argument:
$Users = Import-Csv C:\Temp\ImportUsers.csv
$PasswordProfile = @{ Password = “P@ssw0rd123” }
PS C:> Foreach ($User in $Users) { New-MgUser -UserPrincipalName $User.UserPrincipalName -GivenName $User.FirstName -Surname $User. LastName -DisplayName $User.DisplayName -JobTitle $User.JobTitle -Department $User.Department -UsageLocation $User.UsageLocation -Country $User.UsageLocation -AccountEnabled -MailNickname $User. UserPrincipalName.Split(“@”)[0] -PasswordProfile $PasswordProfile }

Figure 2.49 – Creating new users with the New-MgUser cmdlet
As you can see, the flexibility and capability of the PowerShell interface allow you to do far more than what’s available in the graphical administration centers—with the trade-off that the parameters and syntax for the various modules can vary greatly.
Further Reading
We have only scratched the surface of describing the capabilities of the various PowerShell modules. You can learn more about all of the available modules and their associated cmdlets and best practices at https://learn.microsoft.com/en-us/powershell/.


