If you’re familiar with using an email application such as Outlook, you’re probably familiar with the concept of a contact. A contact in Azure AD or Exchange Online is used for the same purpose—to provide a stored entry in the organization’s address book that can be used as an email recipient. A contact object can be used to reference any mail-enabled recipient—whether it’s an individual’s personal email account, an individual at an organization, a distribution or mailing list, or some sort of shared recipient.
Unlike users, contact objects are not security principals—that is, they have no login identity or password connected to them. Contact objects, however, can be made members of the distribution lists.
Contact objects can be created in either the Microsoft 365 admin center or the Exchange admin center.
Microsoft 365 Admin Center
The Microsoft 365 admin center provides a streamlined interface for managing contacts, as shown in Figure 2.12:

Figure 2.12 – Contacts page in Microsoft 365 admin center
From the Microsoft 365 admin center, you can create individual contacts, import up to 40 contacts in a CSV, and export a list of contacts.
To create an individual contact, click the Add a contact button on the Contacts page and then fill out the fields shown in Figure 2.13:
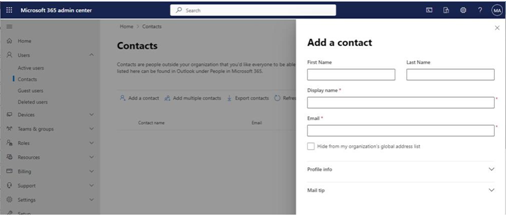
Figure 2.13 – Populating a contact
Required fields are marked with an asterisk (*). You can also fill out additional organization fields such as company, department, and phone numbers under the Profile info section. Any value entered into the Mail tip section will be displayed in Outlook when composing an email to that contact.
By selecting the Add multiple contacts button, you can review the necessary information for uploading a CSV on the Add multiple contacts flyout, as shown in Figure 2.14:
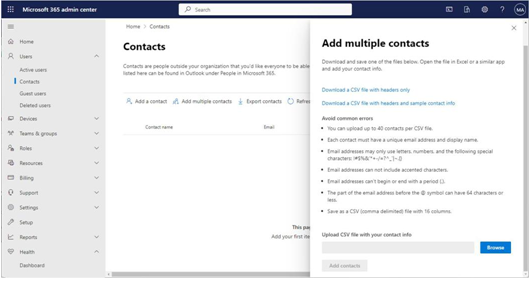
Figure 2.14 – Add multiple contacts flyout
The Microsoft 365 admin center provides two different templates (one with a sample entry) that have the fields necessary for bulk adding contacts. Figure 2.15 depicts a sample template:

Figure 2.15 – Bulk contact import template
After you’ve created the CSV, you can upload it in the flyout to create contact objects.
Exchange Admin Center
The Exchange admin center also provides an interface for adding contacts. See Figure 2.16:

Figure 2.16 – Exchange admin center contact administration
However, the Exchange admin center does not provide a bulk upload or import interface. Adding contacts in the Exchange admin center interface is very similar to the Microsoft 365 admin center experience—select Add a mail contact and populate the required fields in the New Mail Contact wizard, as shown in Figure 2.17:
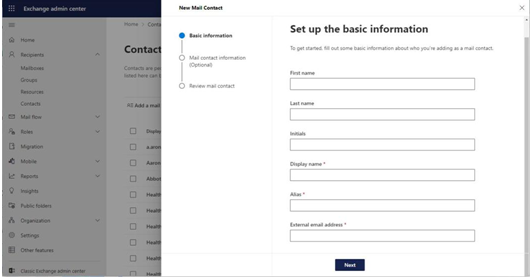
Figure 2.17 – New Mail Contact wizard in Exchange admin center
The Exchange admin center features a few differences from the Microsoft admin center, such as using a wizard instead of a flyout, a few different field names (such as External email address instead of Email address or Office Phone instead of Work Phone), and a new required field: Alias. When creating a contact through the Microsoft 365 admin center, the user interface generates an alias (also known as a mail nickname) automatically, while the Exchange admin center requires you to enter one manually.
Like the Microsoft 365 admin center interface, the Exchange admin center interface allows you to export a list (CSV) of contacts in your organization.


